Wednesday 4 September 2019

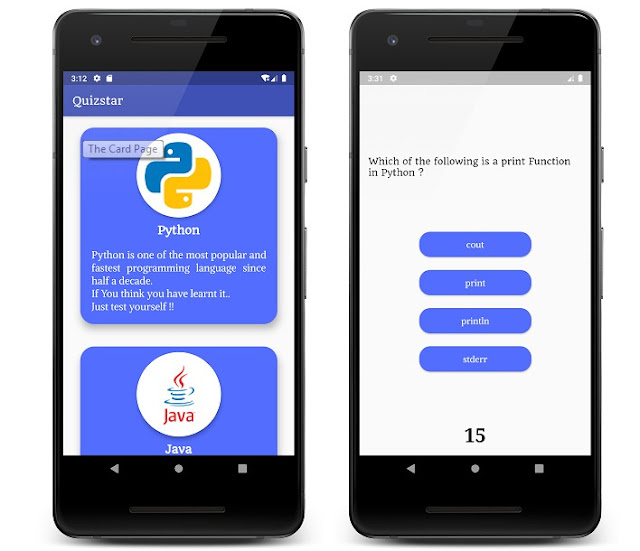
A Quiz App With Timer In Flutter


Quizstar

This is a Complete Quiz App in FLUTTER using a lot of features such as
  • Multiple Screens
  • Timer (30 sec By Default)
  • Button Color Changes On Click
  • Result Page
  • Questions From JSON
    And a lot more...

Changelog/Commit 01

  1. Updated Descriptions
  2. Added JSON Files to Open for Diffrent Cards / Languages
  3. Fixed The Code for Checking Answers..
GitHub

This is a Quiz App With Timer In Flutter — Read More
Latest commit to the master branch on 9-3-2019
Download as zip

A Todo Notes Application developed with flutter


Notes Application - Flutter

A Todo Notes Application developed with flutter, with basic functionalities to write quick Notes.


GitHub

A Todo Notes Application developed with flutter, with basic functionalities to write quick Notes. — Read More
Latest commit to the master branch on 9-3-2019
Download as zip

Peek & Pop implementation for Flutter based on the iOS functionality


peek_and_pop

Peek & Pop implementation for Flutter based on the iOS functionality of the same name.
Finally, the v1.0.0 release! More fluent, more optimised and more beautiful than ever. Very customisable and very easy to use.
It is highly recommended to read the documentation and run the example project on a real device to fully understand and inspect the full range of capabilities.
As a fan of the iOS Peek & Pop functionality, I decided to implement it for Flutter as well.
The package has been tested on iOS but not yet on Android as I don't have access to an Android device with Force Press capabilities. Help about
this would be appreciated.
For devices that don't support Force Press, the package comes with an adaptation to Long Press however the Long Press version of this package is
still under development and is not yet fully tested so consider it as a developers preview.
(The Long Press version is temporarily removed. It will be added back soon.)

The power move of this package is what I like to call "Gesture Recognition Rerouting". Normally, when a new widget with GestureDetector or similar
is pushed over an initial widget used for detecting Force Press or when Navigator is used to pop a new page, the user has to restart the gesture
for Flutter to resume updating it. This package fixes that problem as explained in the documentation:
//This function is called by the instantiated [PeekAndPopChild] once it is ready to be included in the Peek & Pop process. Perhaps the most
//essential functionality of this package also takes places in this function: The gesture recognition is rerouted from the [PeekAndPopDetector]
//to the instantiated [PeekAndPopChild]. This is important for avoiding the necessity of having the user stop and restart their Force Press.
//Instead, the [PeekAndPopController] does this automatically so that the existing Force Press can continue to update even when if
//[PeekAndPopDetector] is blocked by the view which is often the case especially when using PlatformViews.

Installation

It is easy. Don't worry.
If you do not wish to use PlatformViews you can skip the installation instructions.
Old installation instructions are removed. If you wish (for some reason) to use a version older than v0.1.9, see the README of that version for
the relevant installation instructions.
For properly displaying PlatformViews, this package requires the latest Flutter master
branch. Maybe it will work with some other version too but tests made with the webview_flutter
seem to only properly display with the latest Flutter master branch which has improved the PlatformViews that
allow better functionalities such as proper scaling and proper clipping.
If you do not wish to use PlatformViews, you can skip this step.
To use latest Flutter master branch, run the following command.
Note: Don't forget to add io.flutter.embedded_views_previewYES to your Info.plist. See
webview_flutter for more info.
$ git clone -b master https://github.com/flutter/flutter.git
$ flutter channel master
$ flutter upgrade
$ flutter doctor
$ ./flutter/bin/flutter --version

How-to-Use

Also easy.
First of all, as explained in the documentation:
//I noticed that a fullscreen blur effect via the [BackdropFilter] widget is not good to use while running the animations required for the Peek &
//Pop process as it causes a noticeable drop in the framerate- especially for devices with high resolutions. During a mostly static view, the
//drop is acceptable. However, once the animations start running, this drop causes a visual disturbance. To prevent this, a new optimised blur
//effect algorithm is implemented. Now, the [BackdropFilter] widget is only used until the animations are about to start. At that moment, it is
//replaced by a static image. Therefore, to capture this image, your root CupertinoApp/MaterialApp MUST be wrapped in a [RepaintBoundary] widget
//which uses the [background] key. As a result, the Peek & Pop process is now up to 4x more fluent.
TL;DR: Wrap your root CupertinoApp/MaterialApp in a RepaintBoundary widget and use the background GlobalKey from "misc.dart".
This is required for the new optimised blur effect algorithm:
import 'package:peek_and_pop/misc.dart' as PeekAndPopMisc;

class MyApp extends StatelessWidget {
  @override
  Widget build(BuildContext context) {
    return RepaintBoundary(
      key: PeekAndPopMisc.background,
      child: MaterialApp(
        title: 'Peek & Pop Demo',
        home: MyHomePage(title: 'Peek & Pop Demo')
      )
    );
  }
}
If you wish to use the "ScaleUp" or the "Scale Down" features, wrap the widgets you wish to scale down or scale up during the Peek & Pop process with
the scaleUpWrapper and scaleDownWrapper functions from "misc.dart":
@override
Widget build(BuildContext context) {
return Scaffold(
  appBar: AppBar(title: Text(widget.title)),
  body: PeekAndPopMisc.scaleDownWrapper(
        ...,
        0.04,
        ),
    );    
}
Then, create a PeekAndPopController such as:
PeekAndPopController(
  uiChild(),            //Widget uiChild
  false,                //bool uiChildUseCache
  peekAndPopBuilder,    //PeekAndPopBuilder peekAndPopBuilder
  false,                //bool peekAndPopBuilderUseCache
 {Key key,
  quickActionsBuilder           : quickActionsBuilder,
  sigma                         : 10,
  backdropColor                 : Colors.black,
  alpha                         : 126,
  overlayBuilder                : overlayBuilder,
  useOverlap                    : true,
  customOverlapRect,
  useAlignment,                 : false,
  useIndicator                  : true,
  indicatorScaleUpCoefficient   : 0.01,
  willPeekAndPopComplete        : _willPeekAndPopComplete,
  willPushPeekAndPop            : _willPushPeekAndPop,
  willUpdatePeekAndPop          : _willUpdatePeekAndPop,
  willCancelPeekAndPop          : _willCancelPeekAndPop,
  willFinishPeekAndPop          : _willFinishPeekAndPop,
  willClosePeekAndPop           : _willClosePeekAndPop,
  onPeekAndPopComplete          : _onPeekAndPopComplete,
  onPushPeekAndPop              : _onPushPeekAndPop,
  onUpdatePeekAndPop            : _onUpdatePeekAndPop,
  onCancelPeekAndPop            : _onCancelPeekAndPop,
  onFinishPeekAndPop            : _onFinishPeekAndPop,
  onClosePeekAndPop             : _onFinishPeekAndPop,
  onPressStart                  : _onPressStart,
  onPressUpdate                 : _onPressUpdate,
  onPressEnd                    : _onPressEnd,
  treshold                      : 0.5,
  startPressure                 : 0.125,
  peakPressure                  : 1.0,
  peekScale                     : 0.5,
  peekCoefficient               : 0.05,
  popTransition})
  
Widget uiChild() {}

Widget peekAndPopBuilder(BuildContext context, PeekAndPopControllerState _peekAndPopController);

QuickActionsData quickActionsBuilder(PeekAndPopControllerState _peekAndPopController);

Widget overlayBuiler();

bool _willPeekAndPopComplete(PeekAndPopControllerState _peekAndPopController);
bool _willPushPeekAndPop(PeekAndPopControllerState _peekAndPopController);
bool _willUpdatePeekAndPop(PeekAndPopControllerState _peekAndPopController);
bool _willCancelPeekAndPop(PeekAndPopControllerState _peekAndPopController);
bool _willFinishPeekAndPop(PeekAndPopControllerState _peekAndPopController);
bool _willClosePeekAndPop(PeekAndPopControllerState _peekAndPopController);

void _onPeekAndPopComplete(PeekAndPopControllerState _peekAndPopController);
void _onPushPeekAndPop(PeekAndPopControllerState _peekAndPopController);
void _onUpdatePeekAndPop(PeekAndPopControllerState _peekAndPopController);
void _onCancelPeekAndPop(PeekAndPopControllerState _peekAndPopController);
void _onFinishPeekAndPop(PeekAndPopControllerState _peekAndPopController);
void _onClosePeekAndPop(PeekAndPopControllerState _peekAndPopController);

void _onPressStart(dynamic dragDetails);
void _onPressUpdate(dynamic dragDetails);
void _onPressEnd(dynamic dragDetails);
 
Further Explanations:
For a complete set of descriptions for all parameters and methods, see the documentation.
  • Set [uiChildUseCache] to true if your [uiChild] doesn't change during the Peek & Pop process.
  • Set [peekAndPopBuilderUseCache] to true if your [peekAndPopBuilder] doesn't change during the Peek & Pop process.
  • [overlayBuilder] is an optional second view to be displayed during the Peek & Pop process. This entire widget is built after everything else.
  • For all [PeekAndPopProcessNotifier] callbacks such as [willPeekAndPopComplete], you can return false to prevent the default action.
  • All [PeekAndPopProcessNotifier] and [PeekAndPopProcessCallback] callbacks will return a reference to the created [PeekAndPopController] state.
    You can save this instance for further actions.
  • [pageTransition] is the transition to be used when the view is opened directly or when the view is closed. A default [SlideTransition] is provided.
  • Use [PeekAndPopControllerState]'s [void closePeekAndPop()] method to close the Peek & Pop process. Do not call [Navigator.of(context).pop()]
    directly.
  • Use [PeekAndPopControllerState]'s [stage] variable to get enumeration for the stage of the Peek & Pop process. If you want to only know when the
    Peek & Pop process will be or is completed, you can also use [willBeDone] or [isDone] variables.
  • I realised that when an [AppBar] or a [CupertinoNavigationBar] is built with full transparency, their height is not included in the layout of a
    [Scaffold] or a [CupertinoPageScaffold]. Therefore, moving from a Peek stage with a transparent header to a Pop stage with a non-transparent header
    causes visual conflicts. Use this [PeekAndPopChildState]'s [Size get headerSize] and [double getHeaderOffset(HeaderOffset headerOffset)] methods to
    overcome this problem.

GitHub

Peek & Pop implementation for Flutter based on the iOS functionality of the same name. — Read More
Latest commit to the master branch on 9-3-2019
Download as zip

An App Template For GDG DevFest with flutter


GDG DEVFEST APP

This application is for people who want to attend different Devfests and tech events across the world. This app contains pieces of information about tech events.

Get it on Google Play
Get it on the App Store

📸 ScreenShots


Show some :heart: and star the repo to support the project

Overview

DevFest Mobile application is for all the GDG Devfests around the world. You can see the agenda in the app as well as the speakers and other updates regarding the devfest.

Technology Stack

  • Flutter
  • Flutter Bloc
  • Firebase (Upcoming)

Getting Started

  1. Fork repository and clone your fork locally
  2. Install Flutter 1.7.8
  3. Install Android Studio / IntelliJ / VSCode
  4. Preparing Release for Android
  5. Preparing Release for iOS

Building the project

Missing Key.Properties file

If you try to build the project straight away, you'll get an error complaining that a key.properties file is missing and Exit code 1 from: /GDG-DevFest-App-master/android/gradlew app:properties:. To resolve that,
  1. Open GDG-DevFest-App-master\android\app\build.gradle file and comment following lines-
    //keystoreProperties.load(new FileInputStream(keystorePropertiesFile))
    
    signingConfigs {
    // release {
    // keyAlias keystoreProperties['keyAlias']
    // keyPassword keystoreProperties['keyPassword']
    // storeFile file(keystoreProperties['storeFile'])
    // storePassword keystoreProperties['storePassword']
    // }
    }
    buildTypes {
    // release {
    // signingConfig signingConfigs.release
    // }
    }
    
  2. Open GDG-DevFest-App-master\lib\utils\devfest.dart file and customise the texts according to your needs. Eg-
        static const String app_name = “Devfest”;
        static const String app_version = “Version 1.0.4”;
        static const int app_version_code = 1;
    
        //*  Texts
        static const String welcomeText = “Welcome to GDG DevFest”;
        static const String descText =
            ‘’’DevFests are community-led, developer events hosted by GDG chapters around the globe focused on community building & learning about Google’s technologies. Each DevFest is inspired by and uniquely tailored to the needs of the developer community and region that hosts it.’’’;
    
        //* ActionTexts
        static const String agenda_text = “Agenda”;
        static const String speakers_text = “Speakers”;
        static const String team_text = “Team”;
        static const String sponsor_text = “Sponsors”;
        static const String faq_text = “FAQ”;
        static const String map_text = “Locate Us”;
    
  3. Open GDG-DevFest-App-master\lib\home\session.dart file and customise the sessions according to your needs. Eg-
        List<Session> sessions = [
            Session(
                sessionId: “1”,
                sessionStartTime: “9:00 AM”,
                sessionTotalTime: “30 Mins”,
                sessionTitle: “DevByte: From Zero to ML on Google Cloud Platform”,
                speakerImage:
                    “https://avatars1.githubusercontent.com/u/12619420?s=400&u=eac38b075e4e4463edfb0f0a8972825cf7803d4c&v=4”,
                speakerName: “Max Saltonstall”,
                speakerDesc: “Cloud Developer Advocate, Google DevByte speaker”,
                track: "cloud"
            ),
        ]
    
  4. Open GDG-DevFest-App-master\lib\home\speaker.dart file and customise the speakers according to your needs. Eg-
        List<Speaker> speakers = [
            Speaker(
                speakerImage:
                    “https://avatars1.githubusercontent.com/u/12619420?s=400&u=eac38b075e4e4463edfb0f0a8972825cf7803d4c&v=4”,
                speakerName: “Pawan Kumar”,
                speakerDesc: “Google Developer Expert, Flutter”,
                speakerSession: “Talk: Getting Started With Flutter For Web”,
                fbUrl: “https://facebook.com/imthepk”,
                githubUrl: “https://github.com/iampawan”,
                linkedinUrl: “https://linkedin.com/in/imthepk”,
                twitterUrl: “https://twitter.com/imthepk”,
            ),
        ]
    
  5. Open GDG-DevFest-App-master\lib\home\team.dart file and customise the teams according to your needs. Eg-
        List<Team> teams = [
            Team(
                name: “Sundar Pichai”,
                desc: “Organizer”,
                contribution: “Google CEO”,
                image:
                    “https://pbs.twimg.com/profile_images/864282616597405701/M-FEJMZ0_400x400.jpg”,
            ),
        ]
    
  6. Open GDG-DevFest-App-master\lib\map\map_page.dart file and customise the lat long according to your needs. Eg-
       static final LatLng myLocation = LatLng(37.42796133580664,       -122.085749655962);
    
  7. Open GDG-DevFest-App-master\lib\sponsors\sponsor_page.dart file and customise the sponsors data according to your needs. Eg-
       SponsorImage(
            imgUrl: “https://devfest.gdgkolkata.org/assets/img/logos/gd.png”,
        )
    

Contributing

Awesome! Contributions of all kinds are greatly appreciated. To help smoothen the process we have a few non-exhaustive guidelines to follow which should get you going in no time.

Using GitHub Issues

  • Feel free to use GitHub issues for questions, bug reports, and feature requests
  • Use the search feature to check for an existing issue
  • Include as much information as possible and provide any relevant resources (Eg. screenshots)
  • For bug reports ensure you have a reproducible test case
    • A pull request with a breaking test would be super preferable here but isn't required

Submitting a Pull Request

  • Squash commits
  • Lint your code with eslint (config provided)
  • Include relevant test updates/additions

GitHub

An App Template For GDG DevFest — Read More
Latest commit to the master branch on 8-27-2019
Download as zip